|
Creating Merchant Java Classes
To add a custom merchant gateway, you need to subclass the
public abstract class GenericMerchantGateway. Your
new class must implement its abstract methods:
-
init - initializes the connection with a merchant gateway.
-
authorize - verifies that the credit card is valid and has
enough balance for the transaction;
-
capture - confirms that the purchase has been completed
and ready to be settled. This method can be called only
after the authorize method;
- charge - charges an amount from the credit card without prior authorization;
-
voidAuthorize - cancels the transaction that has not yet
settled. This method can be called only after the authorize
method.
Depending on the type of the resource, H-Sphere uses two
schemes for charging users:
-
Immediate - used when no payments to third parties are required.
In this scheme, only charge method is involved.
-
Two-step - used when the transaction involves payments to
third parties, such as OpenSRS. This scheme involves the
authorise method on the first step and capture
or voidAuthorize on the second. The transaction is
performed in between the first and the second steps.
Depending on the merchant gateway, you will have to implement
one of the following payment interfaces:
|
If the online processing center
|
Your class needs to
|
Example:
|
|
offers native Java libraries
|
call methods of the merchant's Java module
|
VeriSign
|
|
uses https protocol
|
send https requests and process https replies
|
Authorize.net
|
|
does not use Java
(e.g. perl, C++, etc.)
|
call your own wrapper that will convert Java calls
into its native language and back.
|
CyberCash
|
To download sample Java libraries, click here.
Note: Use account ID (not user ID) as a parameter to pass to the remote server.
Now you can add this merchant gateway to the system.
Adding Merchants to the System
Create a template for adding and editing your merchant gateway properties.
Follow the rules laid out in the
Template Customiization
manual.
You would have to create three files following these examples:
common/admin/merchant/AuthorizeNet.html
common/control/admin/merchant/AuthorizeNet.html
common/submit/admin/merchant/AuthorizeNet.sbm
and put them in the same directories as the examples.
1. Adding submit template
The submit template (.sbm) is responsible for passing parameters to the
remote server and has two functions:
- mm.update updates values for the current gateway.
syntax: mm.update(gateway_id, VAR_NAME1, VAR_VALUE1, VAR_NAME2, VAR_VALUE2, ....)
gateway_id - you should be able to get it from request, from previous form.
name/value pairs are used to configure the gateway.
VAR_NAME should correspond to parameters that MerchantGateway sets init method.
- mm.new creates the new merchant gateway.
syntax: mm.new(VAR_NAME1, VAR_VALUE1, VAR_NAME2, VAR_VALUE2, ....)
There are several special name/value pairs that have to be used:
"TEMPLATE" is the name of the template that will be used to edit values of the gateway;
"CLASS_NAME" is the java class name of the actual gateway.
2. Adding template controls
The prototype of template controls is common/submit/admin/merchant/AuthorizeNet.sbm
A control template is responsible for collecting merchant gateway registration data
using html forms, for example:
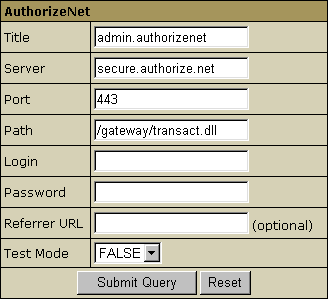
This is an example of a control template:
<tr bgcolor="${LIGHT_STRIP}">
<td>
<call draw_label(lang.label.title)></td>
<td><input type="text" name="value1" value="<if
merchant>${merchant.VALUE1}<else>default value</if>">
</td>
</tr>
This line must be provided for every parameter.
3. Adding a template frame
A prototype of a template frame is common/admin/merchant/AuthorizeNet.html
Template frames are holders for template controls and are
typically the same for all merchant gateways,
so it will suffice to follow the prototype example.
4. Editing view.html
The last thing to do is to add your merchant gateway as a value to the
drop-down list of available merchant gateways.
Create a custom template to substitute common/admin/merchant/view.html.
See the Template
Customization guide for instructions.
In the custom template, locate the select with name template_name
and add the option for your merchant:
<option value="admin/merchant/MyCustomGateway.html">${lang....
Now you must be able to add this merchant gateway using the control panel web interface.
|