|
This document explains how to:
- Configure VPS servers
- Create VPS plans
Configuring VPS Servers.
To configure VPS servers in H-Sphere:
- Add VPS physical server(s).
- Create server groups.
- Add server groups to these physical servers.
- Add VPS logical servers to the server groups.
- Add IPs to the VPS logical servers.
To add a new VPS physical server to H-Sphere, do the following:
- Make sure to install VPS servers to the new box as instructed in the
Installing VPS section of the Sysadmin manual.
- In your admin control panel, select Add P.Server in the E.Manager menu.
- Click Add Physical Server at the bottom of the page that appears.
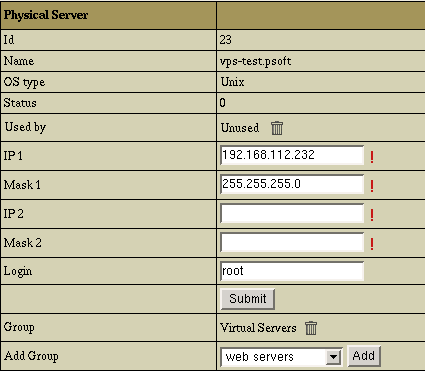
- On the next page, enter the name of the physical server, its IP and associated mask.
- At the bottom of the next page, select the group (type) of logical
servers to be placed on this physical server.
- Select Add P.Server in the E.Manager menu to see the newly added
server in the list of all physical servers in the system.
To create a server group:
- Select P.Servers in the E.Manager menu.
- At the bottom of the page that appears, enter
the name of the server group and select its type.
- Click Add.
To add a group to a physical server:
- Select P.Servers in the E.Manager menu.
- Click the name of the VPS physical server.
- At the bottom of the page that appears, select the Virtual server group
and click Add.

- Now you can create logical servers in this server group.
To add a logical server:
- Go to your admin control panel.
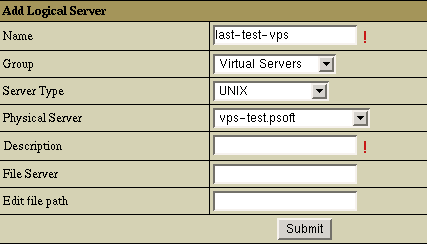
- Click Add L.Server in the E.Manager menu.
- On the page that appears, select corresponding VPS logical and physical servers and enter the properties of the logical server:

- Click Submit.
To add IPs to a logical server:
- Select L.Servers in the E.Manager menu:
- You will be taken to the list of all logical servers
in the system. Choose the VPS server to edit:
- On the page that appears, choose the following IPs from the drop-down box:
- Service IP
- Virtual private server IP
- Enter IPs and click Submit.
- Added IPs will show up in the IPs entry, Logical Server section.
Creating VPS Plans.
VPS plans, similarly to regular plans, are created with Plan Creation Wizards. To create a VPS plan:
- Select Plan Creation Wizards in the Info menu.
- In the list of plans select Virtual Private Server plan wizard.
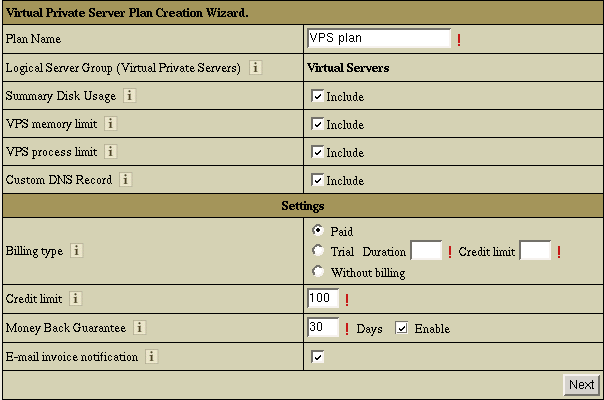
- On Step 1 of the wizard, give a name to the plan.

- Check necessary resources:
- Logical Server Group: users under this plan will be created on the servers that belong to this logical servers group.
- Summary Disk Usage: mandatory resource. Users will be charged for the actual disk space used.
- VPS memory limit: check to restrict memory consumption by one VPS account.
- VPS process limit: check to set the maximum number of simultaneous system processes.
- Custom DNS Record: check to enable creating custom DNS records.
- Click Next to proceed.
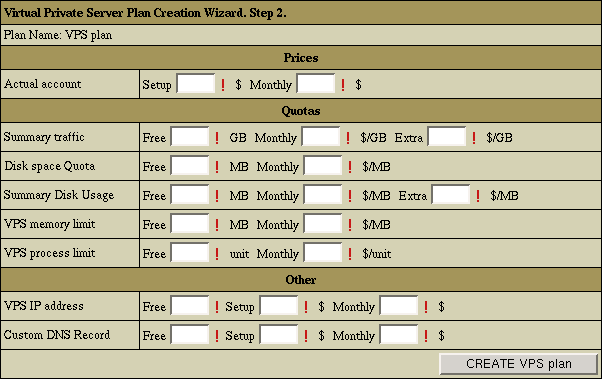
- Step 2 shows the fields to enter free amount of resources necessary for the system to operate.
On this page, you set BASE prices used to calculate prices for ACTUAL BILLING PERIODS.

- Free: the amount of resources you grant users for free.
- Setup Fee: charged when the user creates a new H-Sphere account.
- Monthly Fee: charged once at the beginning of the billing period for the difference between the quota and the free units.
- Usage Fee: charged at the end of each month of the billing period for the prorated amount used up beyond the limit.
- Click Create to complete plan creation.
- Once the VPS plan is created, go back to Plans in the INFO menu and turn
the newly created plan ON for user signups.
- If you want to create more payment periods for the plan, go to INFO ->
Plans -> Settings and add as many payment periods as you need.
Now that the plan is created and enabled, users can sign up under this plan and navigate
their control panels. It takes about 15 to 30 minutes to create a VPS resource,
so make sure to notify your users about this delay before they can start using VPS.
|